*This post may contain affiliate links, meaning If you use these links to make a purchase, I may earn a small commission at no cost to you. Thanks.*
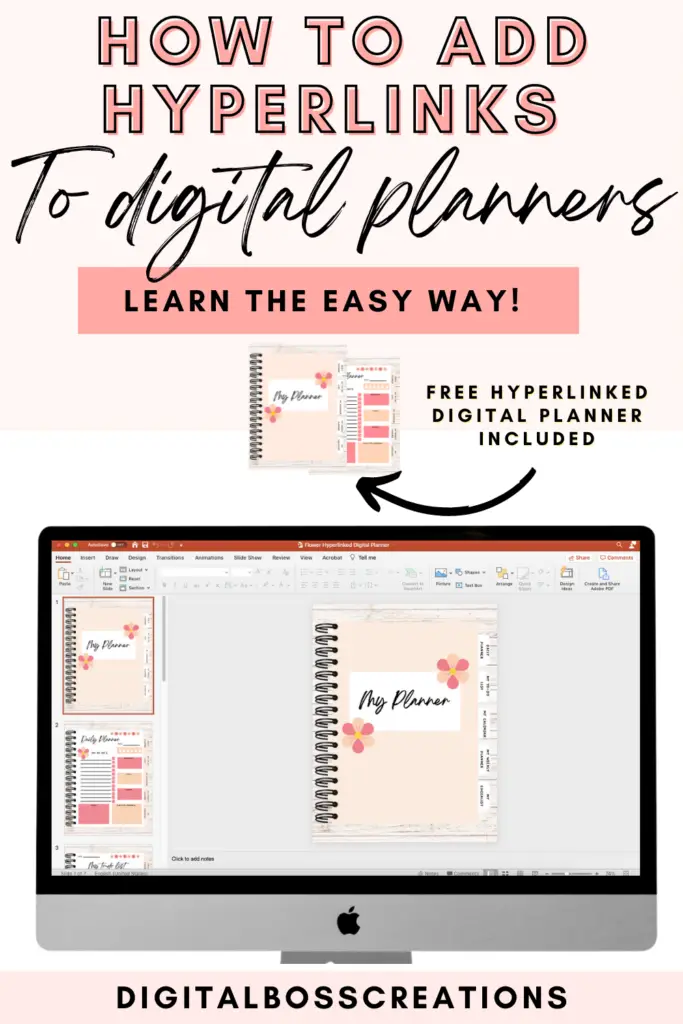
Are you struggling to figure out how to add hyperlinks to your digital planner?
Well, don’t worry.
Here I will explain everything you need to know about adding hyperlinks to your digital planner the easy way.
Download this free digital planner with hyperlinks 2022 here.
But first…
What is a hyperlink?
A hyperlink is essentially a link in the form of an icon, graphic or text that links to another file or object.
For example, the “digitalbosscreations home page” hyperlinks to the digitalbosscreations homepage ( it connects the two).
Hyperlinks in a digital planner
Hyperlinks in digital planners are clickable links within the planner.
When you click the link, it takes you to a specific page that the clickable link is connected to in the digital planner.
Effectively, hyperlinked digital planners are hyperlinked PDFs- once the link has been clicked, it redirects you to another page within the PDF (planner).
Adding hyperlinks to your digital planner is an excellent way to increase your digital planner/ products empire sales.
There is a big market and a need for hyperlinked planners because it is more accessible, easy to use and eco-friendly.
You can use the hyperlinked digital planner in Goodnotes, Notability, and other note-taking apps.
I recently made my first hyperlinked digital planner, and it’s already one of my top sellers.
But enough of my rambles.
Let’s start!
How to add hyperlinks to your digital planner?
Pssst…. I’ve made a tutorial on how I created this digital planner that I’m using for this post.
I create all my digital planners on Canva, a free (pro is the paid version) graphic design software that can help you create any content design you desire.
I wouldn’t be the digital boss planner wiz I am today if it wasn’t for Canva Pro.
Step 1: Head over to Canva.
As mentioned above, I use Canva to create all my digital planners.
Click here if you want to learn my top Canva tips and tricks.

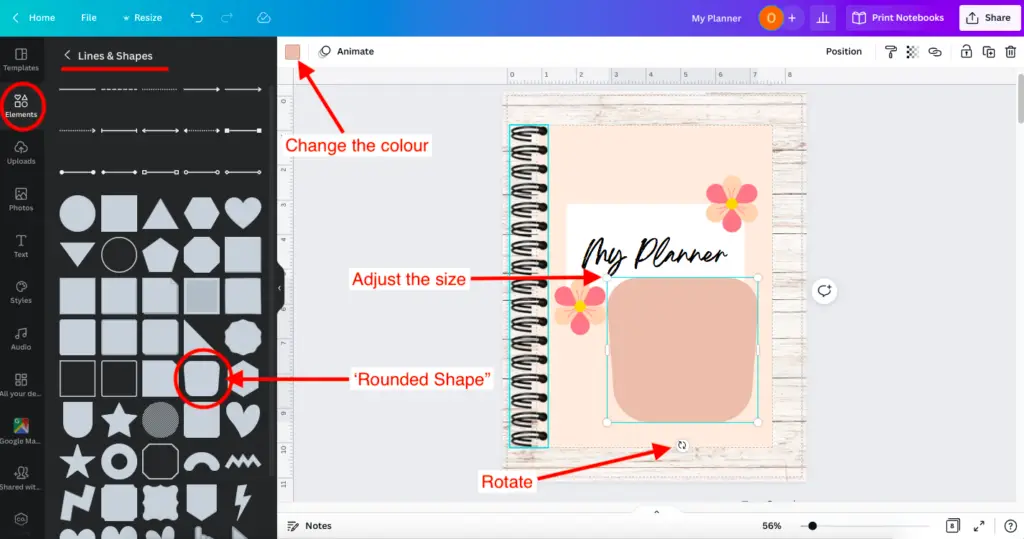
Step 2: Add the tabs.
Now that you are on Canva, we need to add some tabs for the hyperlinks.
So you need to click ‘Elements’, then ‘ Lines & Shapes’, and the shape I use is called ‘Rounded Shape’.
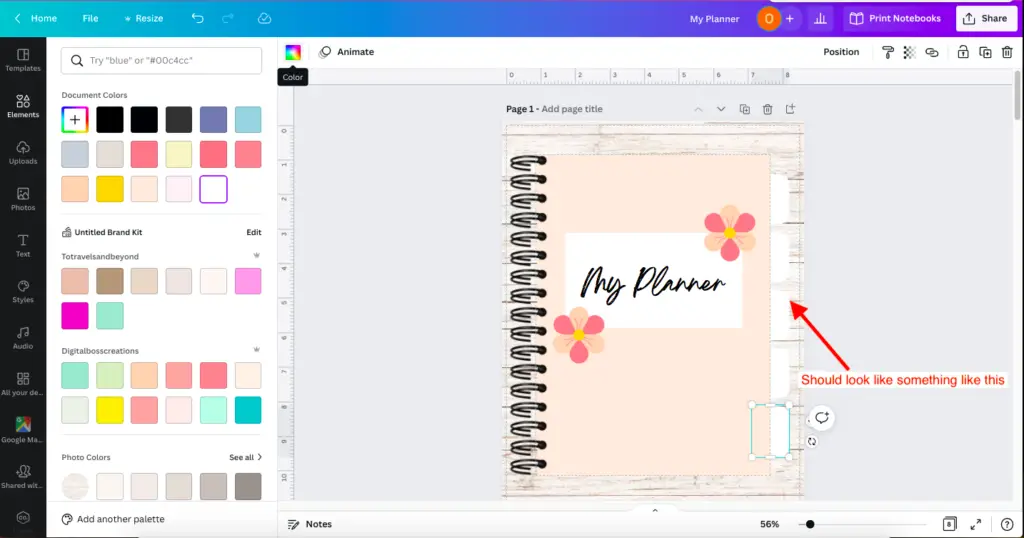
To make the shape look more like a tab – adjust the size, change the colour and rotate.
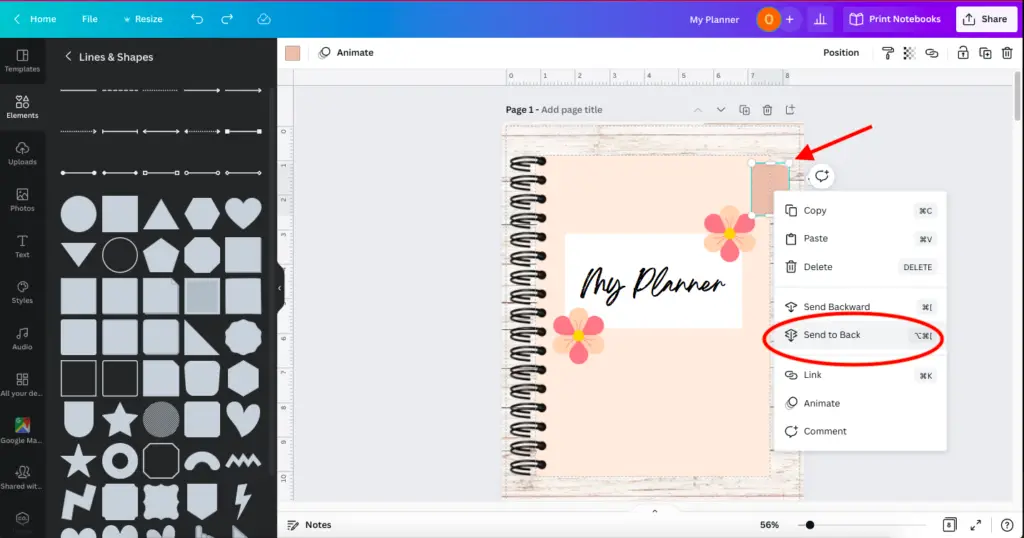
Step 3: Adjust the tab.
Now that you have the size and colour you want, place the tab at the edge of your planner. Then right-click and send to back.
Step 4: Add more tabs.
Duplicate and repeat the above steps depending on how many tabs you want.
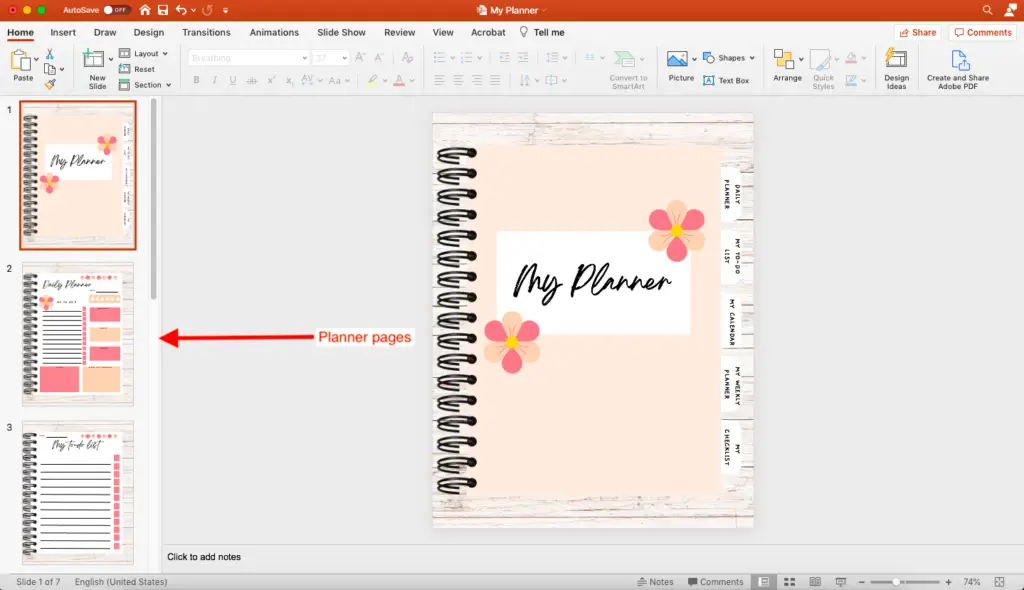
And your planner should look something like this.
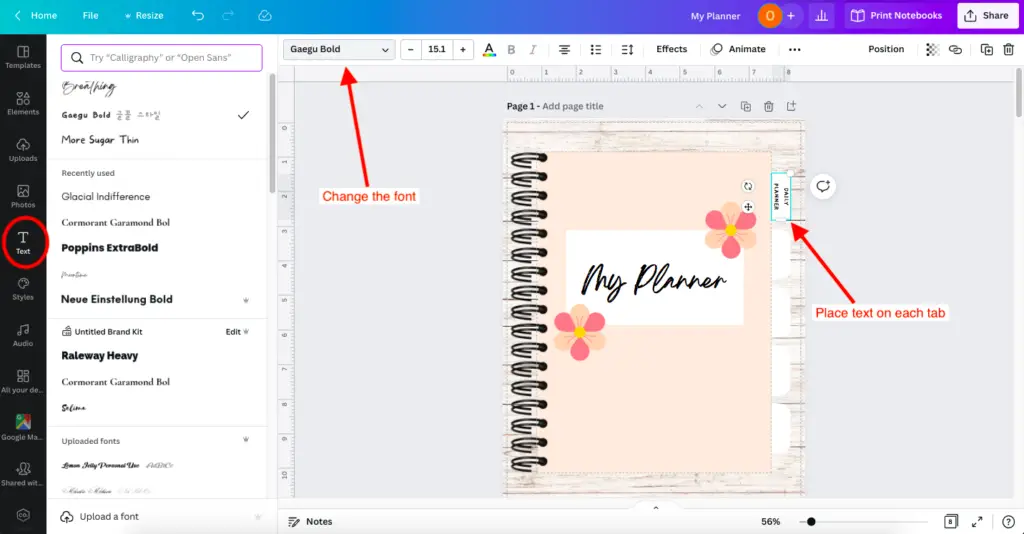
Step 5: Add text to your tabs.
To add text, click the text tab on the left-hand side of the screen. Then change the font and place the text on the tab.
If you have multiple tabs, do the same as above and place the text on each tab.
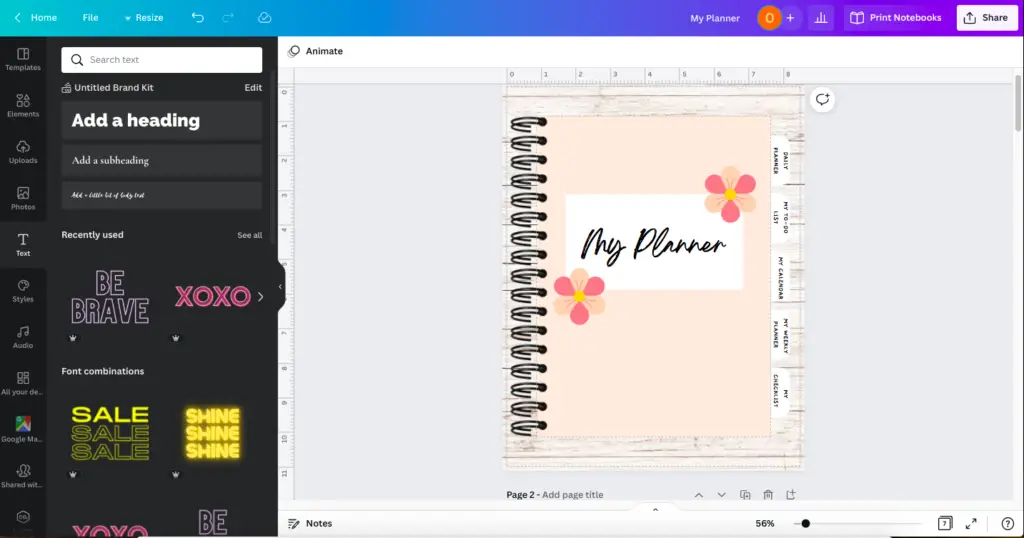
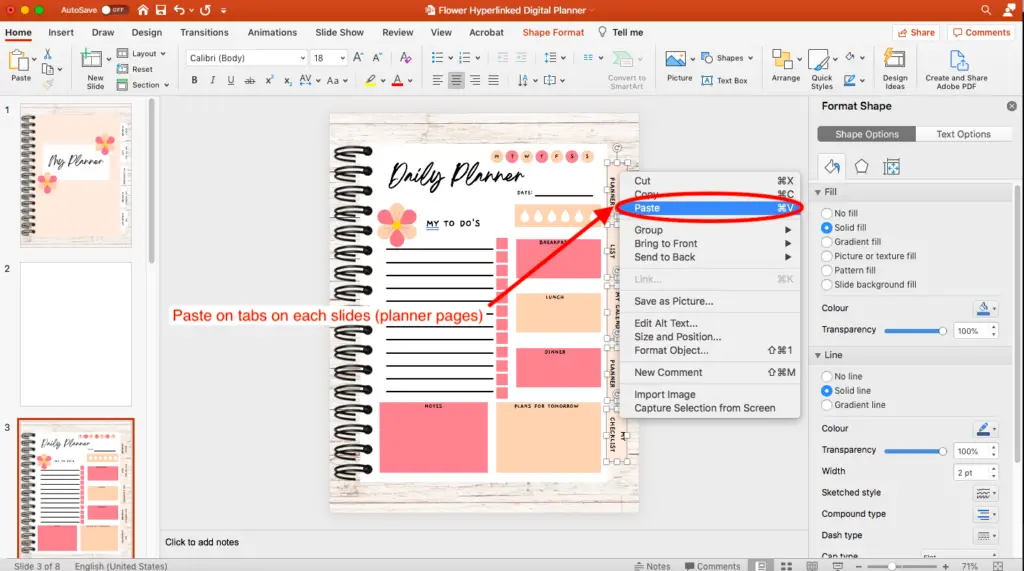
Step 6: Copy and paste tabs onto planner pages.
So now that you have all the tabs you want, next right-click and drag to group the tabs.
Then, copy and paste the tabs on the other planner pages once highlighted.
Each planner page should look something like this.
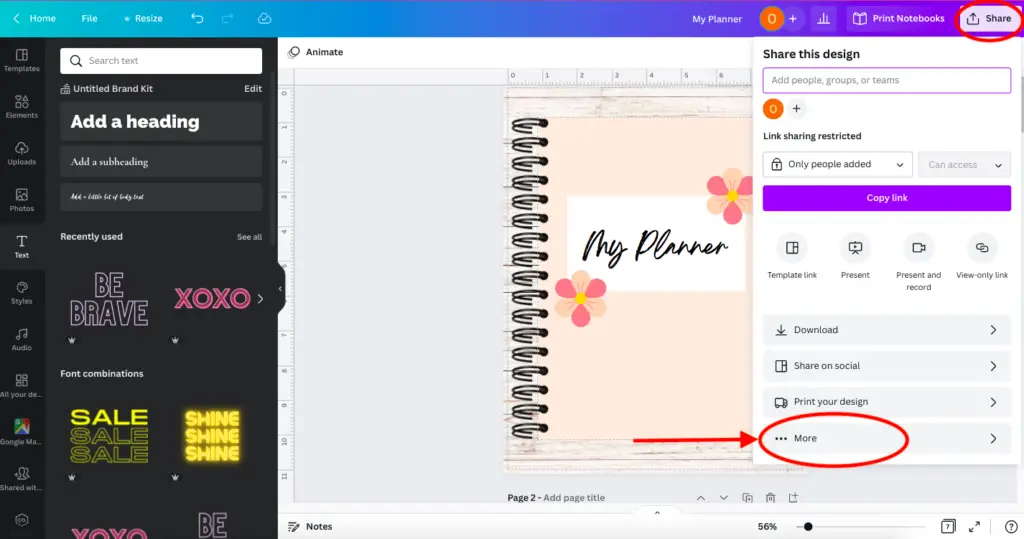
Step 6: Download your hyperlinked planner.
Once you have completed the above steps, head to share at the top right corner and select more.
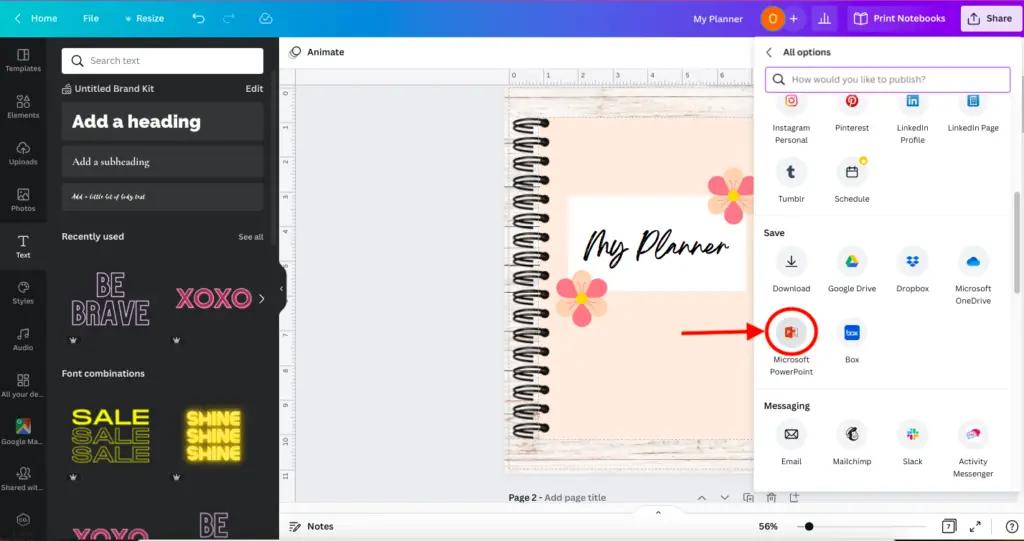
Step 7: Download as a Powerpoint file.
After clicking more, scroll down and see the Microsoft Powerpoint (PPT) option. Or, if you cannot find PPT, you can search for it in the search bar, and it should come up.
Step 8: Yaay, we are in Powerpoint.
I think you should pat yourself on the back for getting this far.
I know that was a lot of info!
As you see in the picture below, your digital planner should look like this.
Step 9: Now, the genuine fun begins. Let’s add hyperlinks to your digital planner.
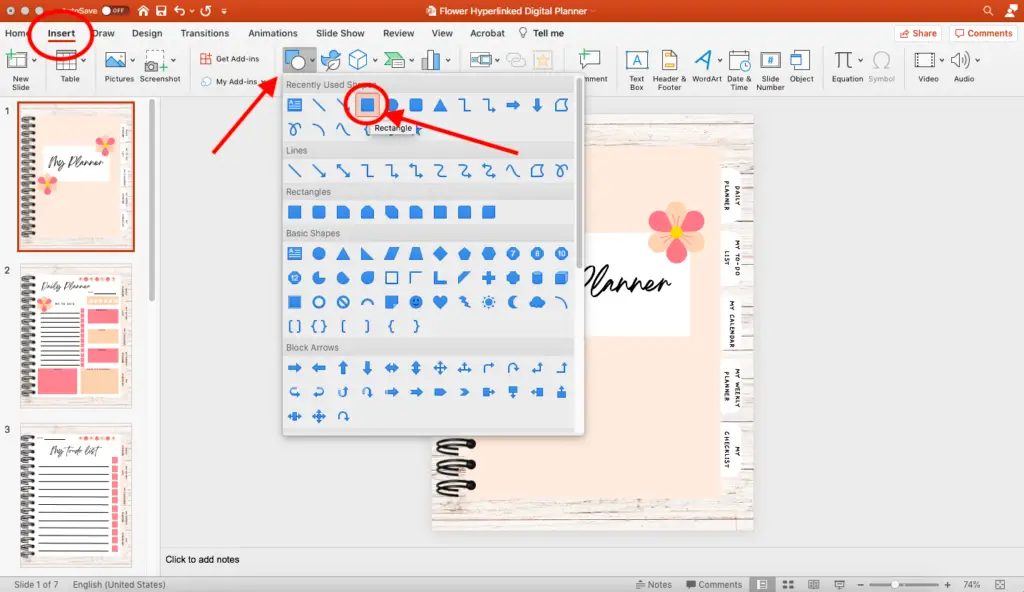
Okay, so we need to create some rectangular shapes.
You need to click insert at the far left corner and then click shapes, giving you a drop where you should see the rectangle shape.
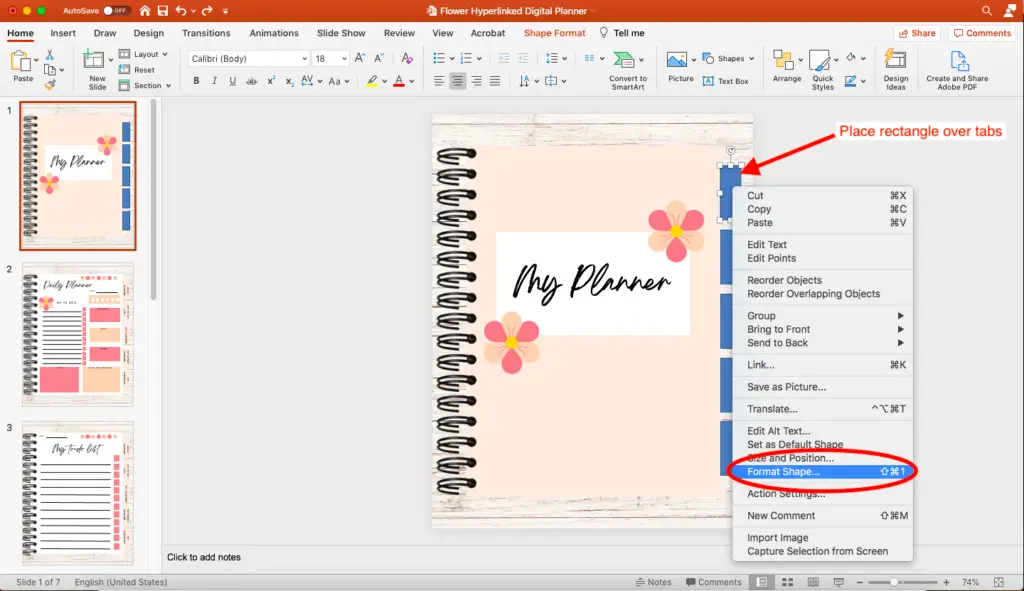
Step 10: Place shape over tabs.
Next, You need to place the rectangle shape over the tabs we created in Canva.
Once you have done that, right-click on the shape and select ‘Format Shape’.
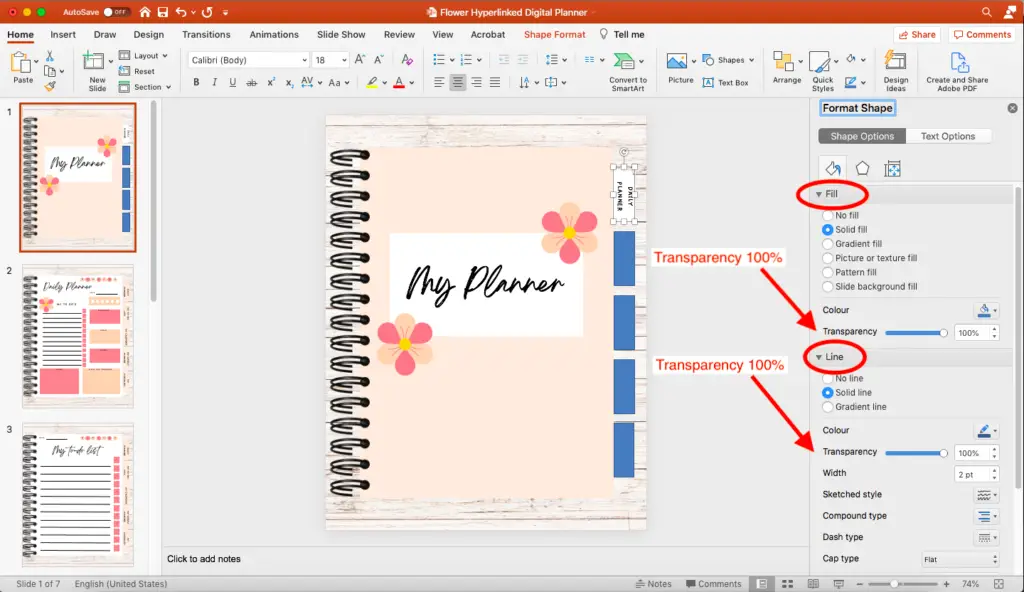
Step 11: The vital part. Format the shape.
After that, you should see the shape options on the right-hand side of the page.
Click the ‘Fill’ dropdown, and with the transparency option, drag the lever to 100%
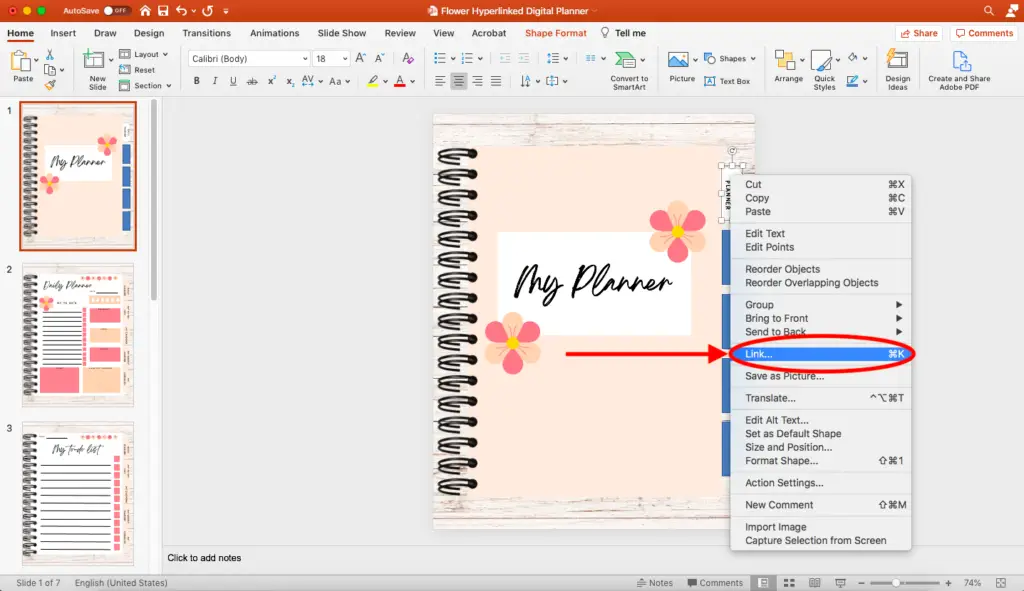
Step 12: Hyperlink each shape.
Now that you have that sorted right-click on the transparent rectangle and select ‘ Link.’
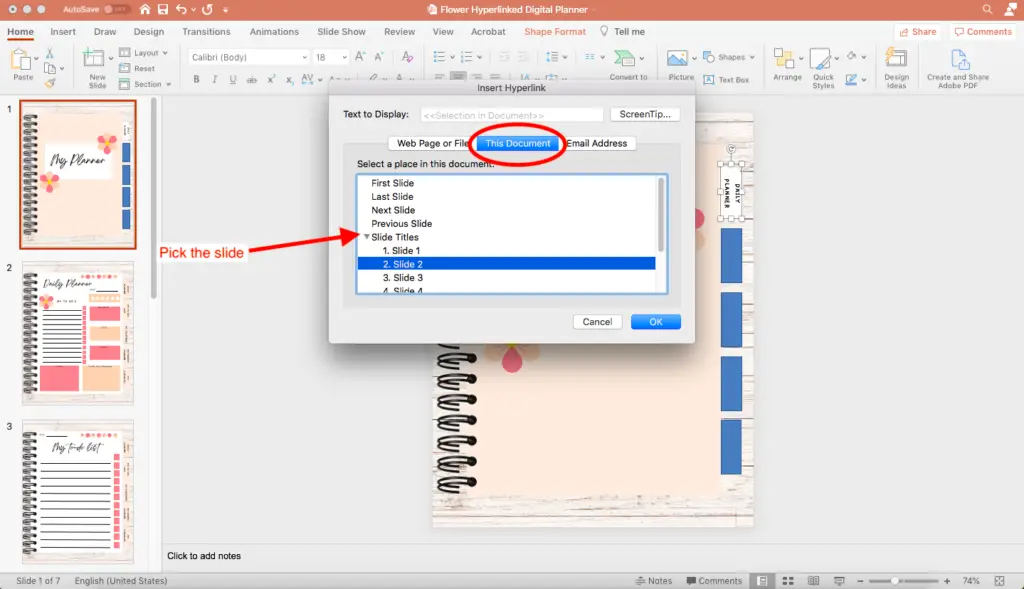
Step 13: Link the slides to your tabs (shape).
Select ‘This Document’ and select the slide you want to be connected with the tab you have highlighted (you are on).
And now, do the same for each tab.
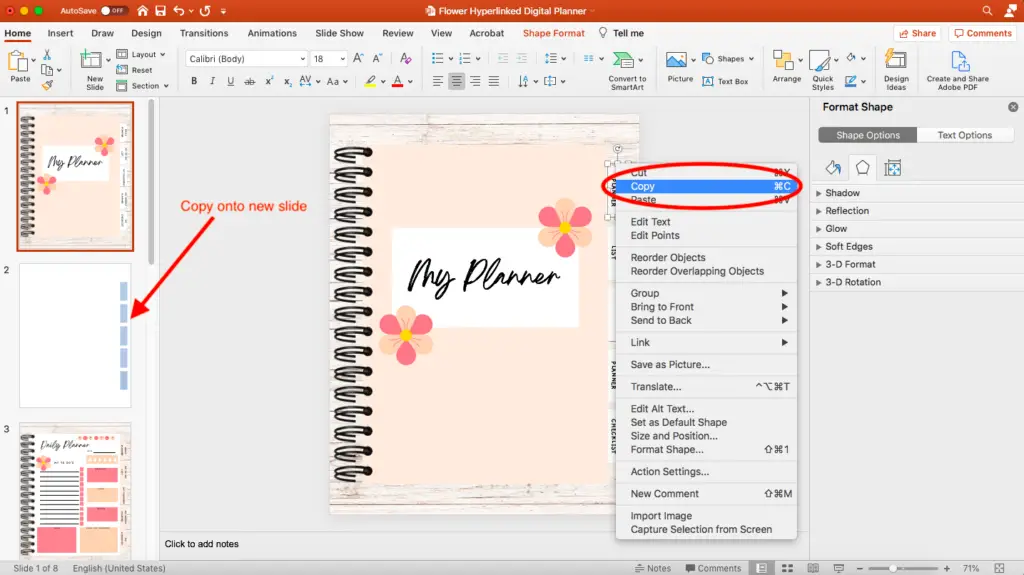
Step 14: A little hack to save time.
This next step is not required, but to save more time, I like to group all of the ‘HYPERLINKED RECTANGLE SHAPES’ together ( by right-clicking drag) and then copy( this does not include the tabs and text created in Canva).
Next, I create a new slide and paste the shaps with the hyperlinks on that slide.
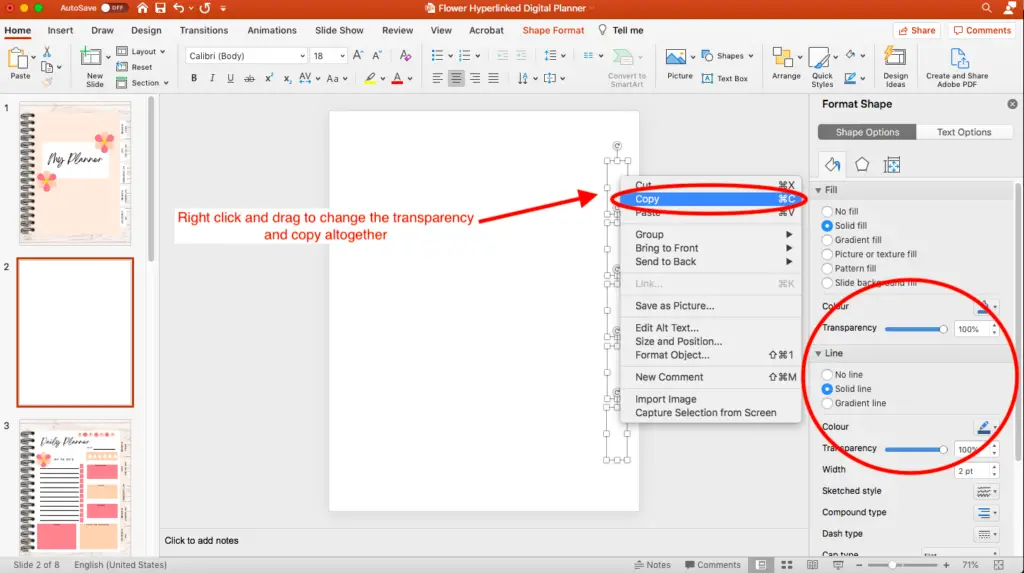
Also, as you can see below, I reduced the transparency of the shapes on the new slide to see them.
(If you do not want to do this step, then all you need to do is continue adding the links to each of the tabs for each planner page)
Step 15: Continue… a little hack.
Right-click and drag to group the shapes once you have copied the hyperlinked shapes on a new slide.
After that, change the transparency to 100%, right-click, and copy.
Step 16: Paste and add the hyperlinks to your digital planner page tabs.
Alrighty, we are almost there!
You need to paste the hyperlinks to the rest of the planner page tabs.
And voila, you have now hyperlinked your digital planner!
If you want to double-check that the links work, click the reader view symbol ( the one that looks like a book) at the bottom to check if your links work.
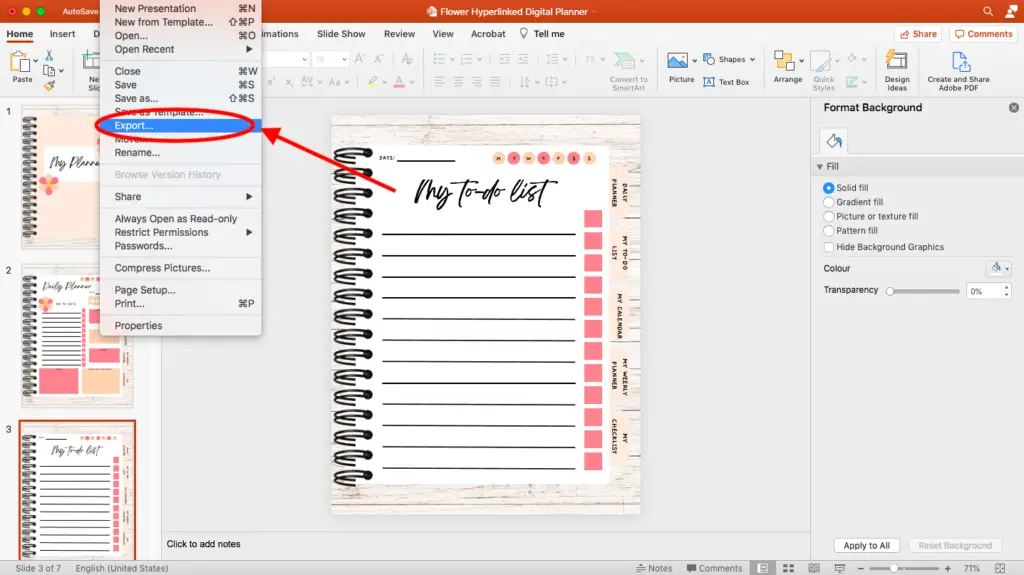
Step 17: Export the file into a PDF.
Next, you must click ‘File’ and then ‘Export’ to convert it into a PDF.
You should now have a saved PDF file of your hyperlinked digital planner.
Open the PDF File and check to see if the hyperlinks work.
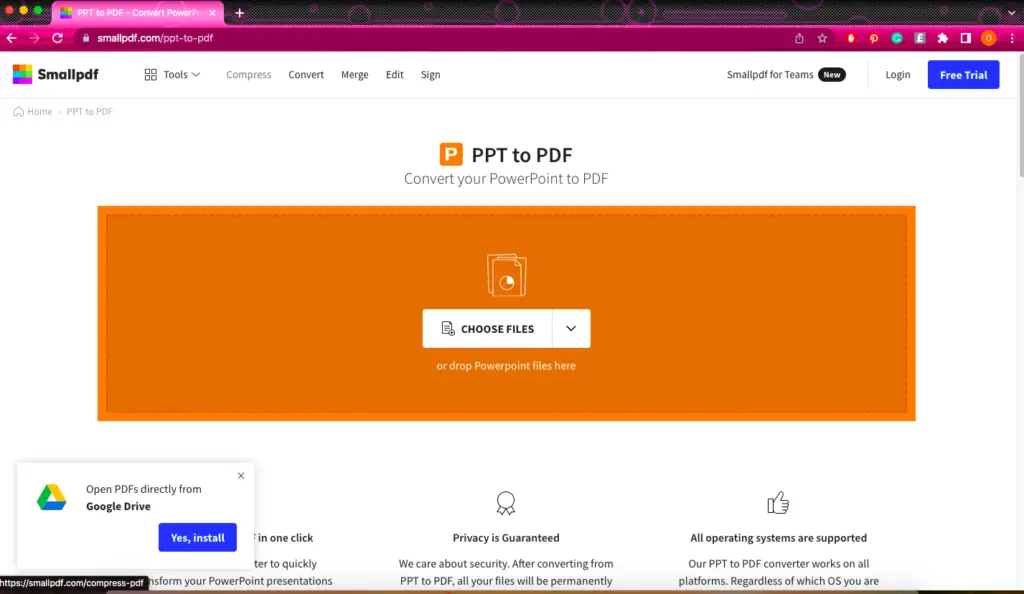
Step 18: What if the links don’t work?
Don’t worry; I have found a solution if your hyperlinks don’t work.
Head to Smallpdf.com (a free PPT to PDF converter), then upload your PPT file. Once that has finished uploading, you can download your converted PDF file, and your hyperlinks should work now.
Create digital planners like a boss babe course
If you want to learn the ins and outs of creating digital planners to sell on Etsy, my course, Create Digital Planners Like A Boss Babe, is for you!
This course is specially tailored to beginners to help them create fabulous digital planners that customers can’t stop buying.
What’s included in the course:
- Easy to follow video tutorials to help you create digital planners from start to finish, using Canva and PowerPoint
- Over 50+ free Canva templates to help you to create digital planners and to upload a digital listing on Etsy
- Learn different graphic techniques using Canva
- A free bundle of fonts and graphics that you can use for commercial use
- Two bonus sections: how to add value to your digital planners & how to sell your digital planners on Etsy
- A 30-day guarantee if you are unable with your purchase (which I’m sure is very unlikely!)
To find out more about this course, click here.
Final Thoughts: How to add hyperlinks to your digital planner
Yaaaay!!!!
You have successfully added hyperlinks to your digital planner as you have reached this point.
It wasn’t as hard as you thought, right?
Now that you have this skill in your bag, you can use it to create digital planners with hyperlinks.
You’ll have that upper hand over the other digital planner sellers if you incorporate hyperlinks to your planners.
And you know what that means.
Yep.
Cha-ching! More money.
Don’t forget that Canva is an incredible software; it has helped me a lot, and I wouldn’t know where to start with digital planners if it wasn’t for Canva.
I want you to succeed in your digital planner journey, and Canva is excellent just for that.
What are you waiting for?
SIGN UP FOR A 30-DAY CANVA PRO TRIAL NOW!
Thanks for reading this blog post. I hope you enjoyed it and learned a lot.
Let me know what you think in the comment section below.
Remember, you can download this free digital planner with hyperlinks 2022 here.
You may also love:
- 10 helpful Canva tips and tricks to make designing much easier
- Canva Free vs Canva Pro: Which one is worth it?
- The top 10 profitable digital planners to sell on Etsy and make passive income
- How to create a digital planner to sell using Canva like a boss
Tools To Use To Help Build Your Digital Planner Empire:
- Try Canva Pro free for 30 days
- Get 30-days free Skillshare access
- Visit my PLR Canva Template Shop
- Download amazing graphics and fonts with Creative Fabrica and Creative Market
- A helpful guide to opening an Etsy store
- Get your 40 free Etsy listings
- My Etsy shop (for digital planners and printables) use the Promo code: THANKYOU22 for a 5% discount on all purchases.
- Learn how to create incredible digital planners to sell on Etsy with the Create Digital Planners Like A Boss Babe Course
If you are looking for some free resources, check out my freebies page!
ive jjust discovered you on YouTube. Very Helpful content. love it.
Thanks, Rujina! Glad you find my content helpful; I really appreciate it.