Do you want to find out how to create a digital planner to sell using Canva like a boss?
Then you are at the right place.
Want to make passive income selling digital planners?
‘Ding, ding ding’, again, you are at the right place.
This blog post will highlight how you can produce digital planners using Canva to sell online in less than 30 minutes!
And, oh yeah, make passive income!
To download this free digital daily planner, click here.
If you’d rather watch a video, here’s a youtube video of how to create digital planners.
What is Canva?
Before we get started, let’s get into the basics.
Canva is a graphic design platform used to create posters, presentations, social media graphics, documents, etc.
Canva is amazing!
I’m by no means a very creative person- to be honest, my drawing skills stop at stick figure designs. I know, so embarrassing.
However, Canva has allowed me to tap into that inner creativity that I never knew I had.
And now, I can confidently say that I’m somewhat a wiz at designing graphics, planners and social media graphics.
Don’t worry, trust me, you’ll feel the same way!
I have a Canva blog post that explains why Canva is so great!
Is Canva Free?
Canva currently has three plans:
Free plan: This allows you access to all the tools to start your design journey.
Pro plan: Everything is free, with access to premium tools.
Enterprise Plan: Everything included in pro. However, it is more tailored to scaling your business brand and content.
I highly recommend Canva Pro, as it’s inexpensive (£10.99/$12.99 a month), and you get various options to help you build your digital planner empire. Once you have Canva Pro, you don’t need any other software ( if you choose) to help create your digital planners.
*This post may contain affiliate links, meaning If you use these links to make a purchase, I may earn a small commission at no cost to you. Thanks.*
Create a digital planner to sell using Canva like a boss
Okay, now we got the prerequisites out of the way. Let’s begin!
Step 1: Canva homepage, creating a design, and sizing
First things first.. get yourself onto Canva.
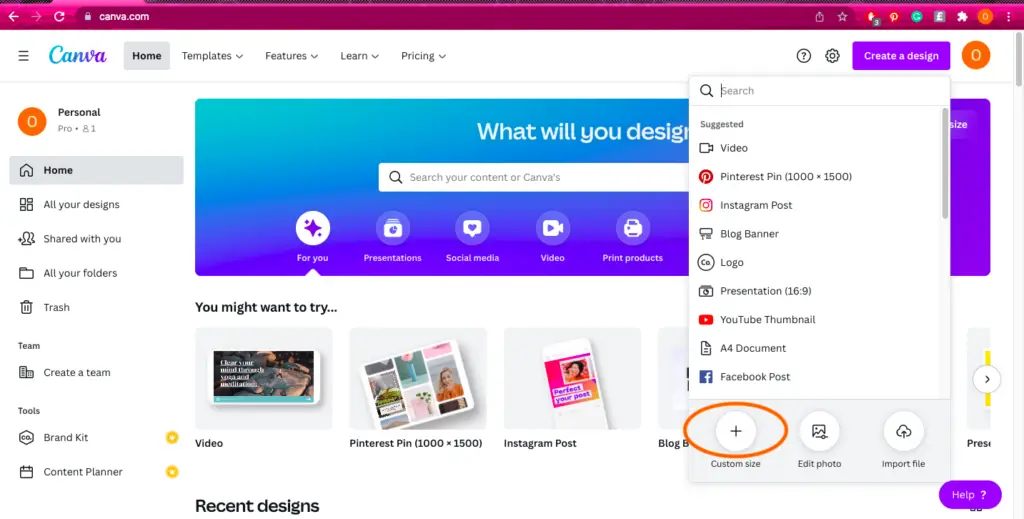
Next, click ‘Create a design’ on the right-hand corner of the Canva website.

Once you have clicked on ‘create a design, ‘ scroll down to the ‘custom size’ symbol at the bottom left of the dropdown.
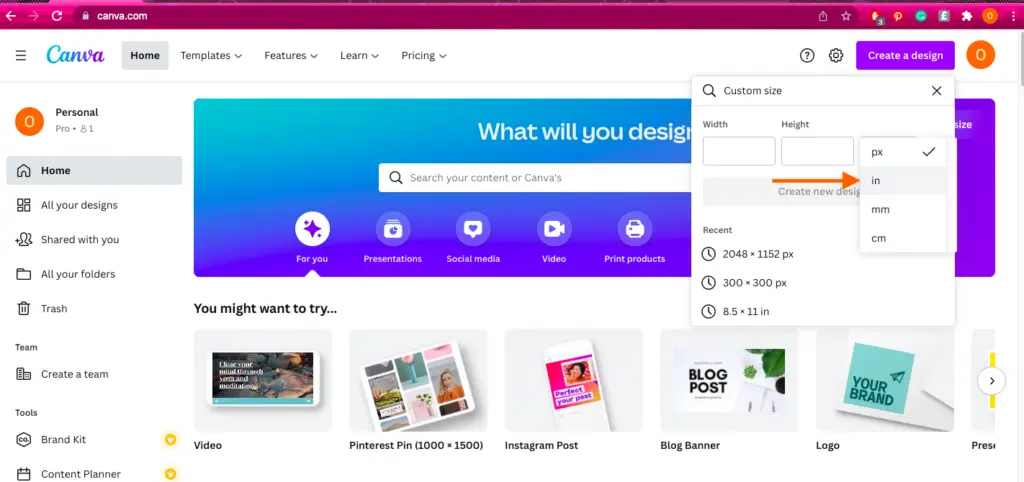
Next, change the measurements to inches (in)
And finally, change the width to 8.5 and the height to 11 (planner size), and then click ‘ Create a new design.’
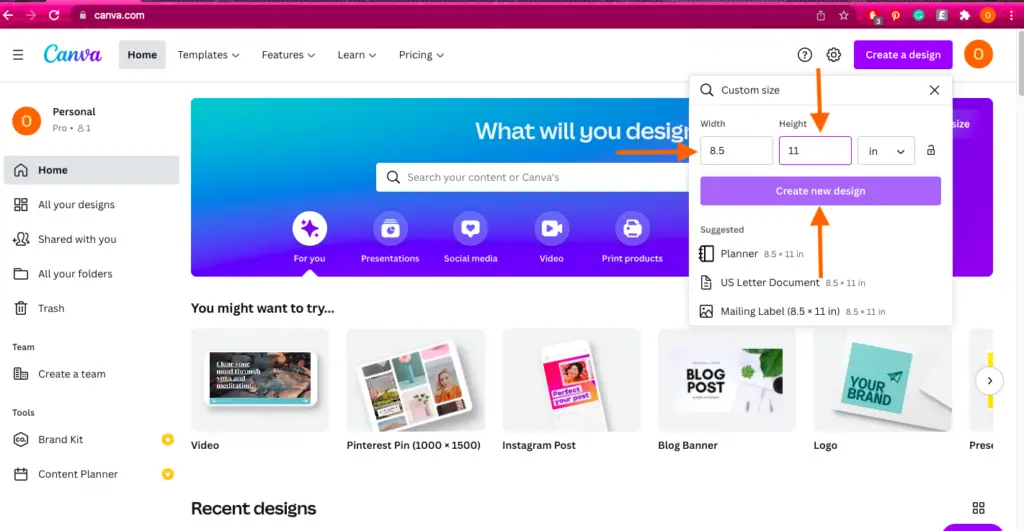
That’s it. The first step is complete! It was that easy.
Step 2: design mode, create a planner template and learn the basics
Right, now, we have step 1 completed onto step 2.
After you create your design from the last step in step 1, you should now be in the design mode in Canva (see screenshot below).
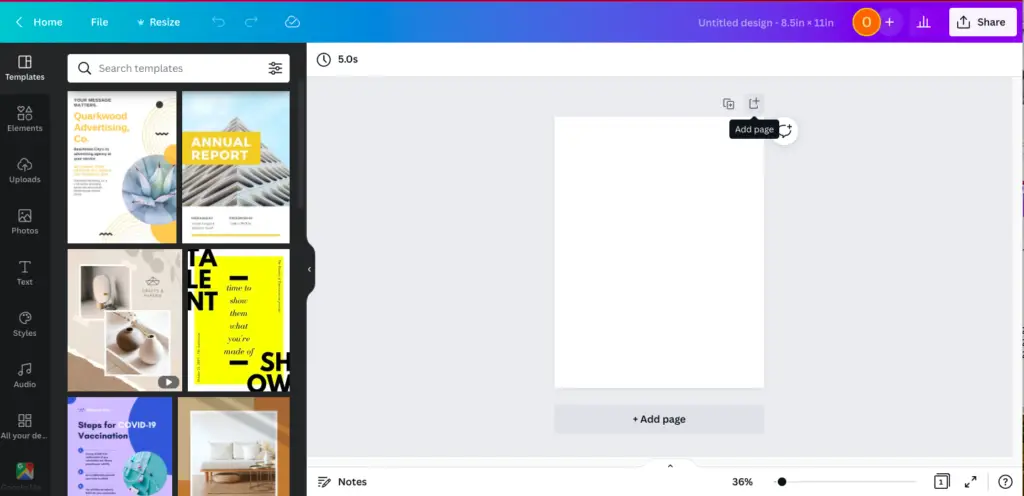
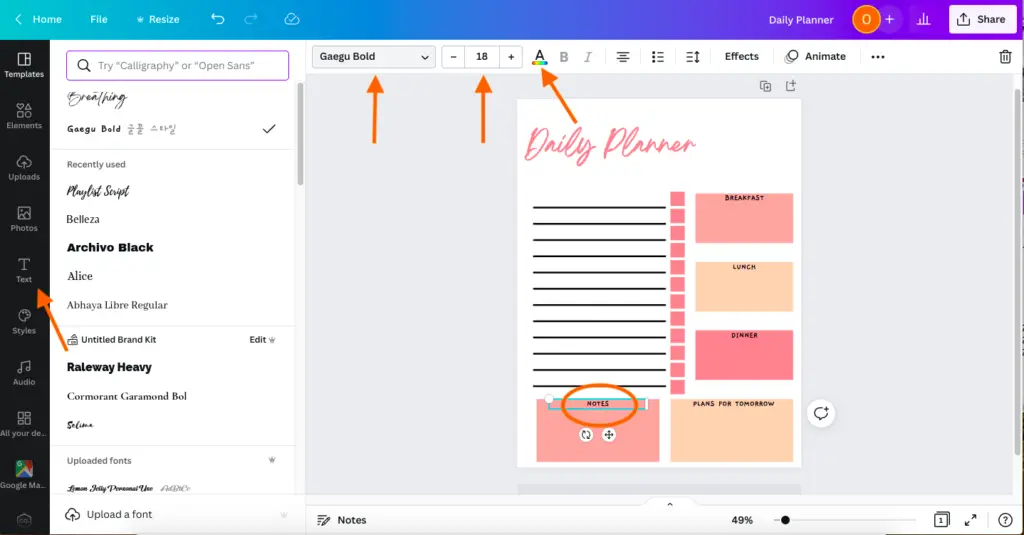
Next, we want to add text! You will see all these different tabs on the left-hand side of the Canva design mode. Click the ‘text tab, and then click ‘ add a heading.
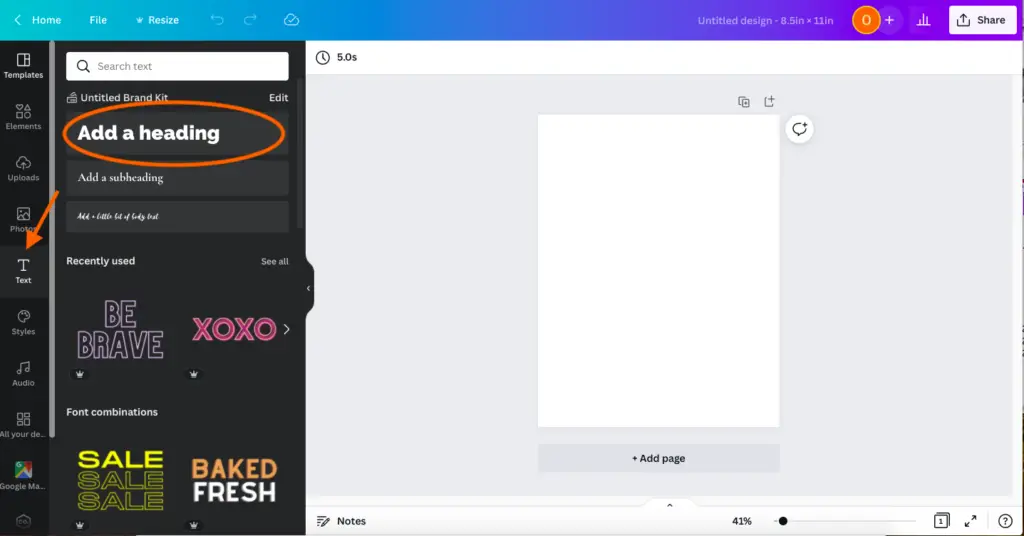
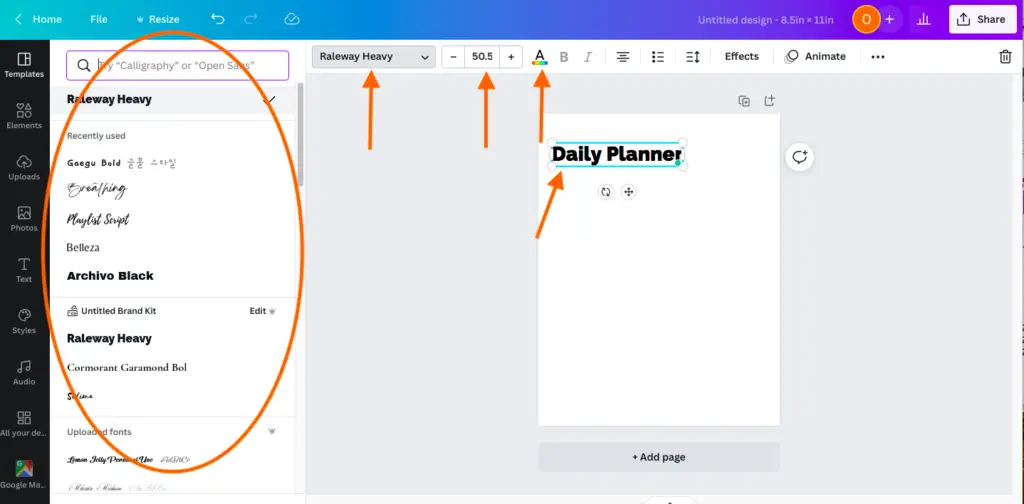
Once you have done that, type the name of your planner, then move the heading wherever you please. As you can see, you have lots of options to modify your text. You can change the font, size and colour (make sure you have clicked on your text first to change it).
After you have formatted your text, next, we want to start adding some elements.
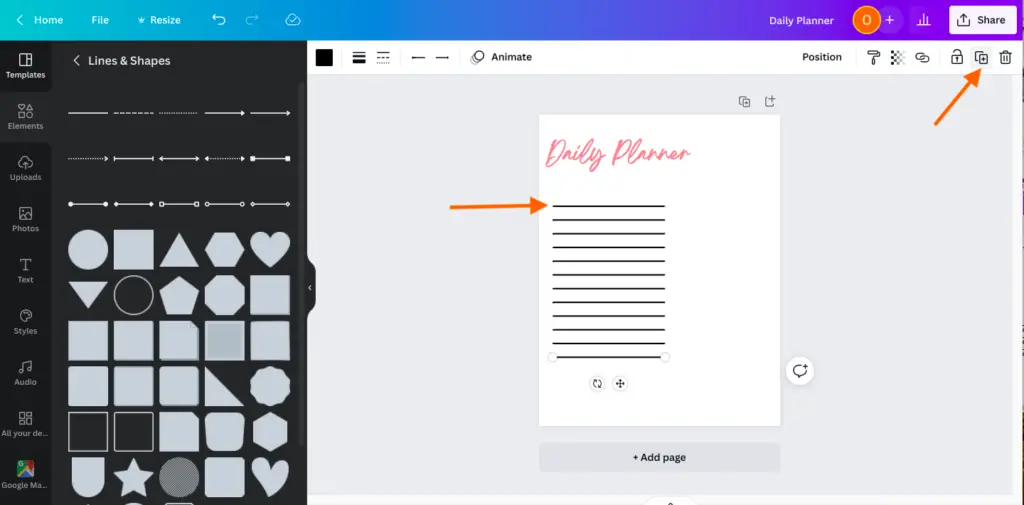
On the left-hand side, click ‘elements’ and then select ‘lines & shapes’ (if you cannot see lines & shapes, not to worry, type in the search bar above ‘lines’). Select a line, I have selected just a primary line, but you can select any line you want.

Now that you have selected your line, this is where all the fun happens!
This is to duplicate the line. Click your line, and in the right-hand corner, select the symbol with the two squares and the plus sign (if you cannot see this, right-click with the line selected, and it should be there). I have duplicated 11 lines, 12 lines altogether, but you can go ahead and duplicate as many as you want.
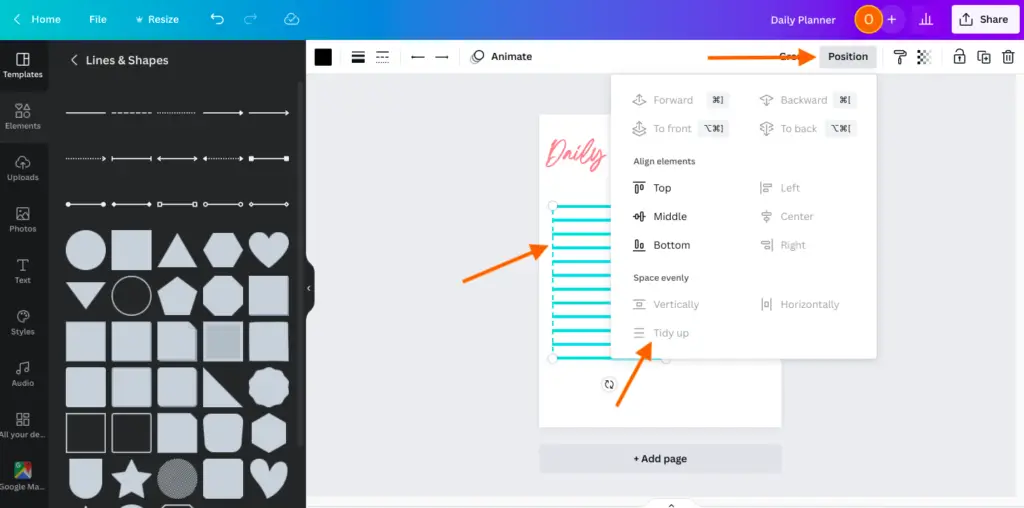
To ensure that your lines are all aligned, highlight all your lines and then click on the ‘position’ tab. Right at the bottom left, select tidy up (as you can see, the tidy up tool was not highlighted because my lines were already automatically aligned)
Related Posts
- 10 amazing digital products to sell this summer to earn passive income
- 10 helpful Canva tips and tricks to make designing much easier
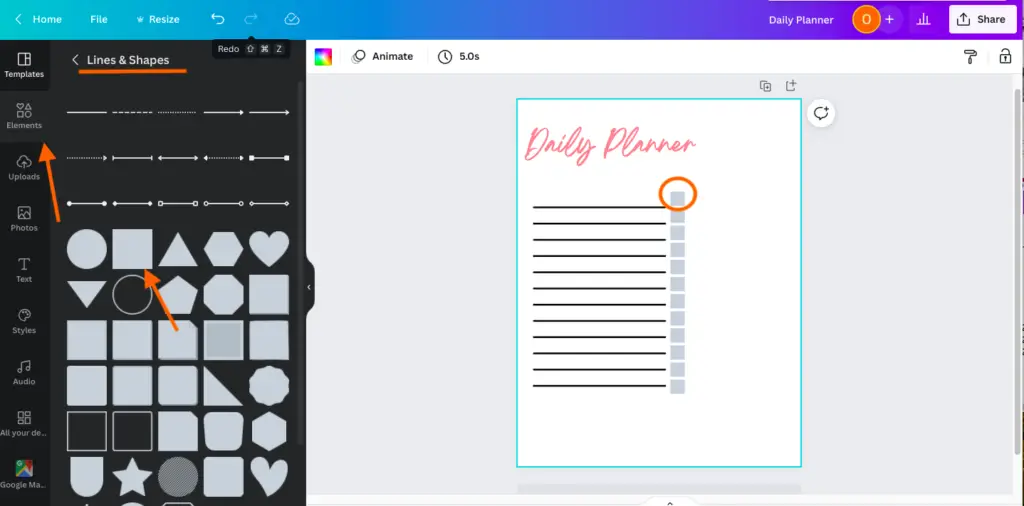
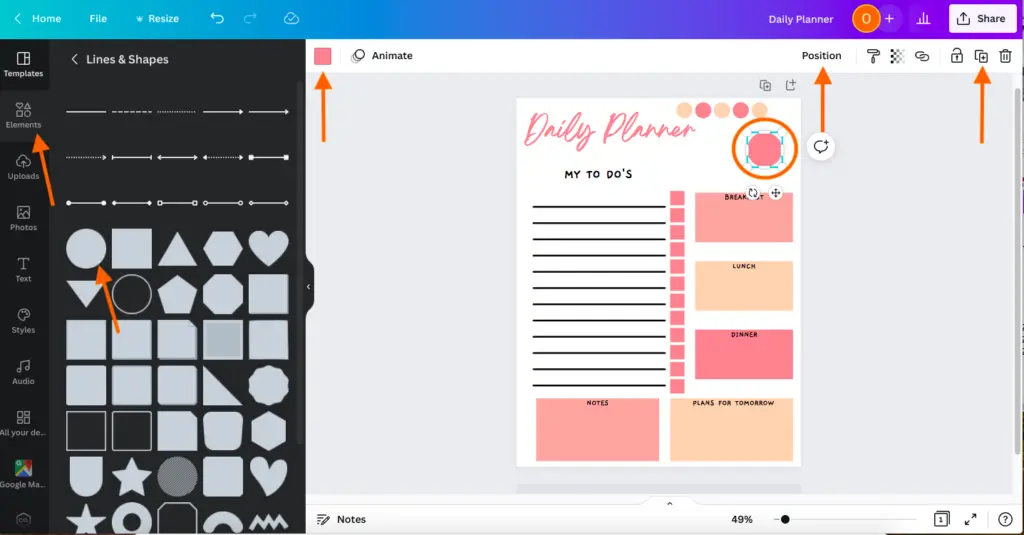
Next, we need some boxes. Click elements, select ‘lines & shapes’ on the left-hand side, or type in the search bar ‘square/box’. Then select a square so we can make those our checkboxes.
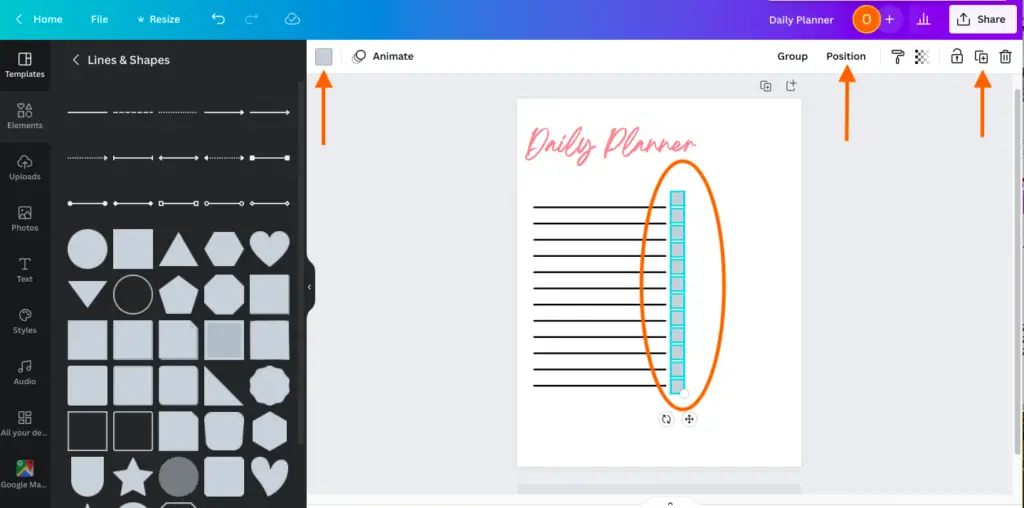
Again, highlight your square and then duplicate, align (with ‘tidy up’) and change the colour, which you can do with the colour box next to the animate tab.
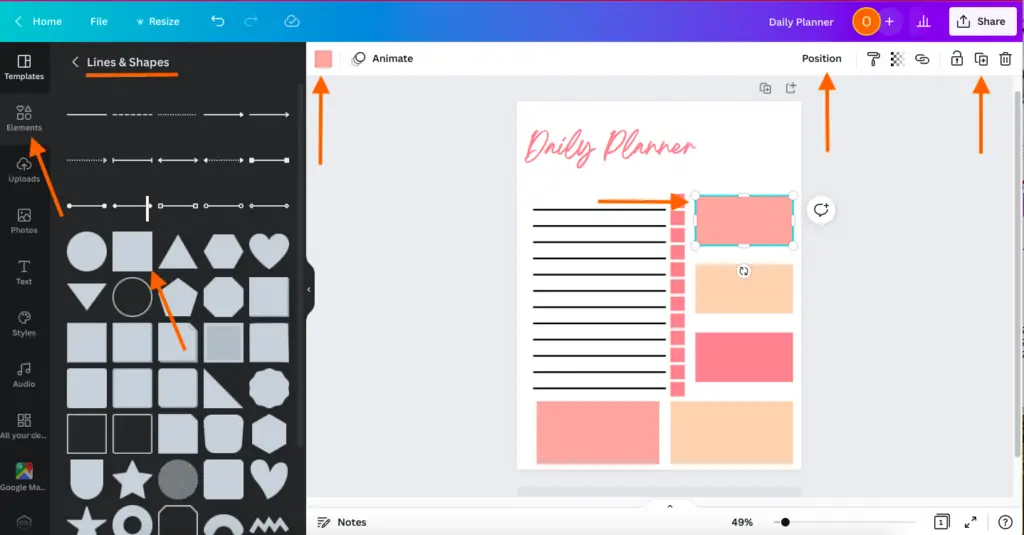
Add more squares!
As you can see, I have added more squares on the right-hand side and at the bottom of the planner page. I wanted to add different sections for meals, notes and plans for tomorrow. You can add as many squares as you want
Next, we want to give the boxes headings.
So click the ‘text’ tab on the left-hand side and place the text at the top of the boxes. I made the boxes for breakfast, lunch, dinner, plans for tomorrow, and notes ( but you change it to whatever you want).
Go ahead and change the font, size, and colour ( you should be a pro now, you got this!).
So I’ve added some circles at the top right corner for the days of the week ‘M, T, W, T, F, S, S’.
You must click on elements, find the circle shape, and select it! Then place it at the top of the planner, duplicate x6, change colour, position and then tidy up to align the circles.
After that, click on the text tab. Select the text, place it in the circle, write the first letter of the days of the week and repeat for all the circles.
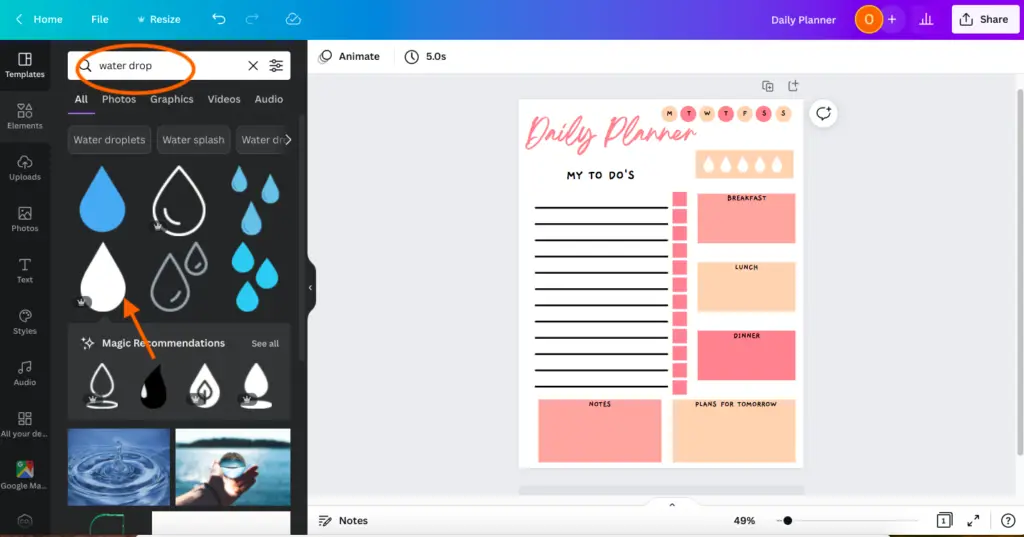
What I have done next is made a box and place water drops inside the box, so the planner has a little water intake tracker.
To do this, place a box from the elements tab, type in a water drop in the search box, select whatever water drop you please, and then place it in the box and duplicate ( to how many you want).
Step 3: add graphics, rename, save, and download
We are almost there! You got this.
To add a graphic to your design, select the element tab and in the search bar, type in the graphic you want for your planner (Canva has an array of graphics).
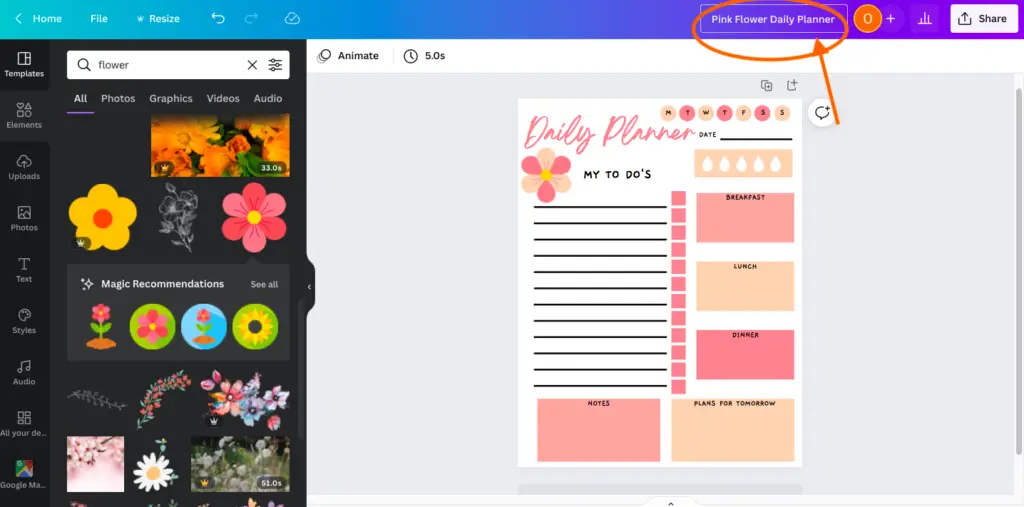
For this tutorial, I thought a flower would be cute, so I typed in ‘flower’ in the search box.
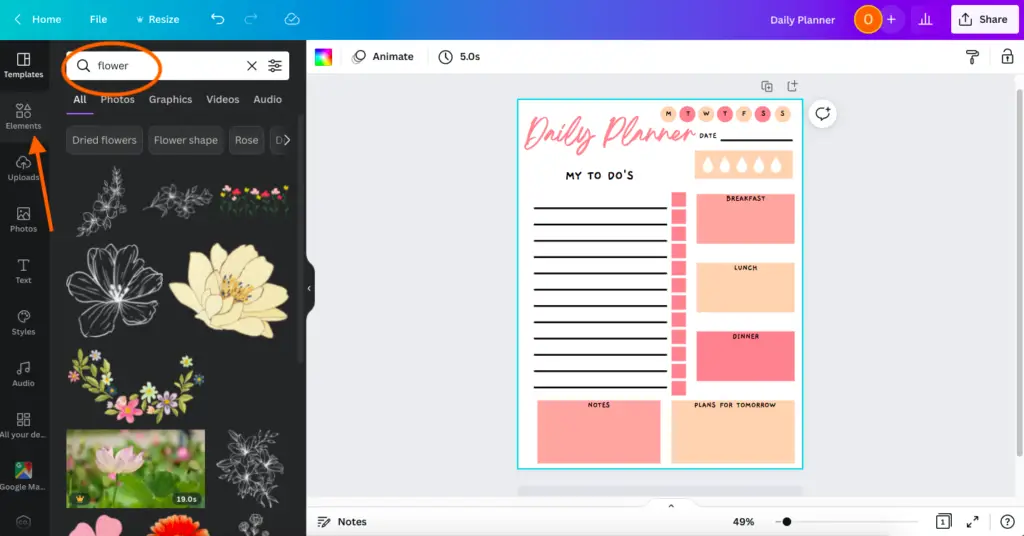
Select the graphic you want and place it on the planner wherever you see fit. I like to make sure that I can modify and change the colour with the graphics I pick (as with some, you cannot).
To change the colour, select the graphic on your design, and you should see the colour boxes at the top of the page, select the colour boxes and change the colour to any colour you want.

To rename your planner, select the text box on the right-hand side of the design page. Then type in the name of your fantastic planner.
Canva is incredible, so incredible that it saves all your work automatically.
The cloud symbol with the tick inside means that your work is saved.
To download your planner, click the share button at the top right-hand corner and scroll down to download.
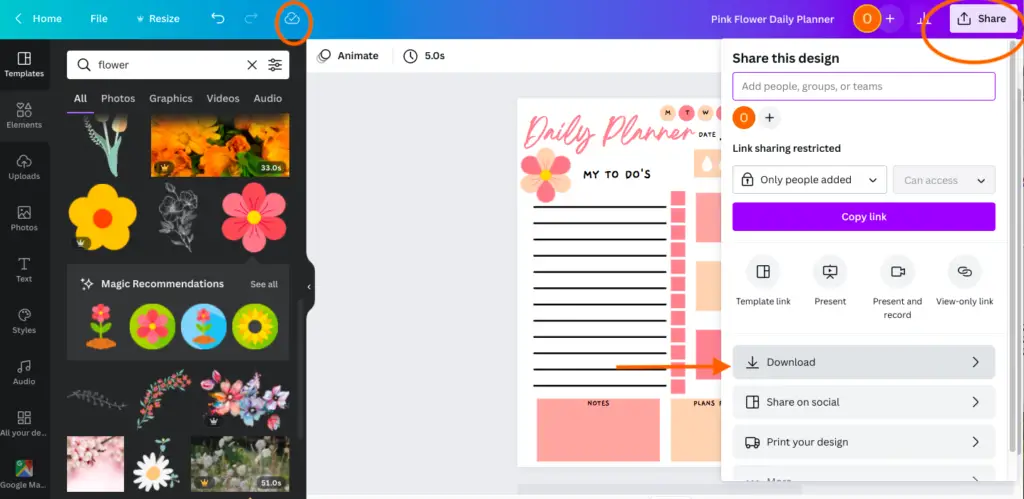
Once you have clicked download, select the dropdown and ‘PDF Print’.
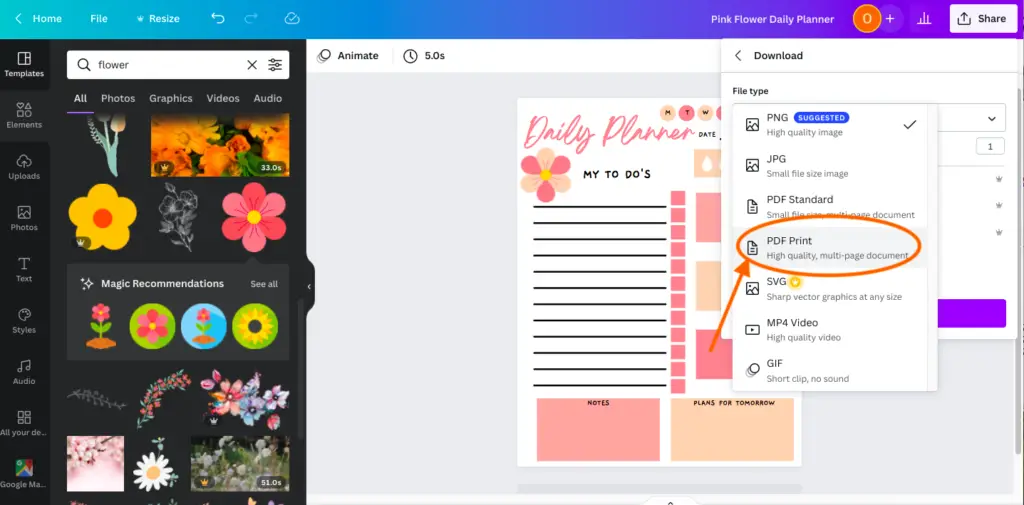
The file will then start downloading to your computer. Once it’s downloaded, you can select it and see the finished product you have successfully created!
Create digital planners like a boss babe course
If you want to learn the ins and outs of creating digital planners to sell on Etsy, my course, Create Digital Planners Like A Boss Babe, is for you!
This course is specially tailored to beginners to help them create fabulous digital planners that customers can’t stop buying.
What’s included in the course:
- Easy to follow video tutorials to help you create digital planners from start to finish, using Canva and PowerPoint
- Over 50+ free Canva templates to help you to create digital planners and to upload a digital listing on Etsy
- Learn different graphic techniques using Canva
- A free bundle of fonts and graphics that you can use for commercial use
- Two bonus sections: how to add value to your digital planners & how to sell your digital planners on Etsy
- A 30-day guarantee if you are unable with your purchase (which I’m sure is very unlikely!)
To find out more about this course, click here.
Final thoughts: Create a digital planner to sell using Canva
There you have it, folks! The create a digital planner to sell using Canva tutorial.
That wasn’t too bad.
Believe me when I say it takes a bit of practice to get the method and style you envision your planner to be (I know from experience that it took me a while to get the hang of it).
It’s all trial and error!
But hopefully, you found this tutorial helpful, and it has given you the push you needed to start your digital planner empire.
Also, check out my Create Digital Planners Like A Boss Babe Course if you want to take your digital planners to the next level and start selling them on Etsy.
In addition, don’t forget that Canva is an incredible software; it has helped me a lot, and I wouldn’t know where to start with digital planners if it wasn’t for Canva.
I want you to succeed in your digital planner journey, and Canva is excellent just for that.
What are you waiting for?
SIGN UP FOR A 30-DAY CANVA PRO TRIAL NOW!
I can’t wait to see your designs. I know you are going to kill it in the digital planner sphere!
In the comment selection below, let me know what you think of this digital planner tutorial.
To download this free digital daily planner, click here.
You may also love:
- 10 helpful Canva tips and tricks to make designing much easier
- Canva Free vs Canva Pro: Which one is worth it?
- How to add hyperlinks to your digital planner the easy way with PowerPoint?
- The top 10 profitable digital planners to sell on Etsy and make passive income
Tools To Use To Help Build Your Digital Planner Empire:
- Try Canva Pro free for 30 days
- Get 30-days free Skillshare access
- Visit my PLR Canva Template Shop
- Download amazing graphics and fonts with Creative Fabrica and Creative Market
- A helpful guide to opening an Etsy store
- Get your 40 free Etsy listings
- My Etsy shop (for digital planners and printables) use the Promo code: THANKYOU22 for a 5% discount on all purchases.
- Learn how to create incredible digital planners to sell on Etsy with the Create Digital Planners Like A Boss Babe Course
You can also check out my freebies page, where I have a selection of free digital products.
With Canva, is to easy create a digital planner! I already do it.
Exactly! Super easy to create digital planners with Canva.
Aw, this was a very nice post. Taking the time and actual effort to create a great article… but what can I say… I hesitate a whole lot and don’t seem to get anything done.
Thanks for the lovely feedback. If you need any help with anything, you can contact me at olivia@digitalbosscreations.com