Are you creating your digital planner using Canva? However, you’re unsure how to add hyperlinks to your digital planner in Canva.
Well, that’s why I’m here!
I’ll show you how to hyperlink your digital planner using Canva, and guess what? You don’t need Canva Pro (paid version) to hyperlink planner pages using Canva.
By the end of this post, you’ll be a pro at adding hyperlinks to your digital planner using Canva.
And if you plan on selling your digital on Etsy, you know what that means, more cha-ching!
What is Canva?
First things first, what is Canva?
Suppose you’re new to creating digital products. In that case, Canva is an easy-to-use graphic design platform that can help you create amazing designs such as social media posts, printables, presentations, invitations, posters, and digital planners.
What I love about Canva is that it’s beginner friendly, and you don’t need to be a professional graphic designer to create incredible designs!
Canva is free to use, although they do have a paid (Canva Pro), which is super affordable at $11.99 a month.
I have just for you a 30-day Canva Pro free trial! Check out Canva Pro now; trust me, you won’t regret it.
What are hyperlinks?
A hyperlink is essentially a link in the form of an icon, graphic or text that links to another file or object.
For example, the daily planner tab hyperlinks to the daily planner page ( it connects the two).
Hyperlinks in digital planners are clickable links within the planner.
When you click the link, it takes you to a specific page that the clickable link is connected to in the digital planner.
Effectively, hyperlinked digital planners are hyperlinked PDFs- once the link has been clicked, it redirects you to another page within the PDF (planner).
How to hyperlink your digital planner using Canva
*This post may contain affiliate links, meaning If you use these links to make a purchase, I may earn a small commission at no cost to you. Thanks.*
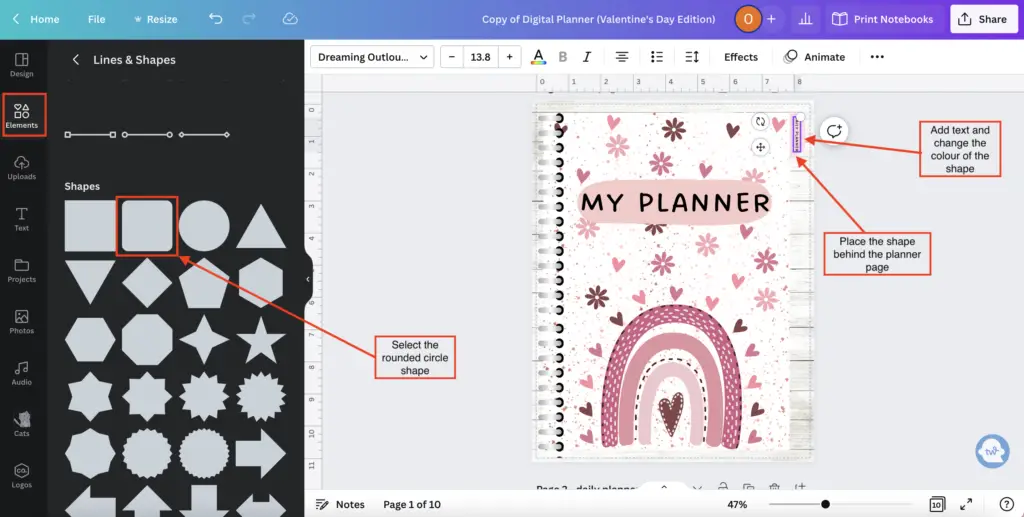
Step one: Create your digital planner tab using Canva.
First things first, select Elements on the left-side ribbon, then select the shape Rounded Circle to create your tabs.
Place the shape behind your digital planner page. You can add text to your tab and change the colour and font to your liking.
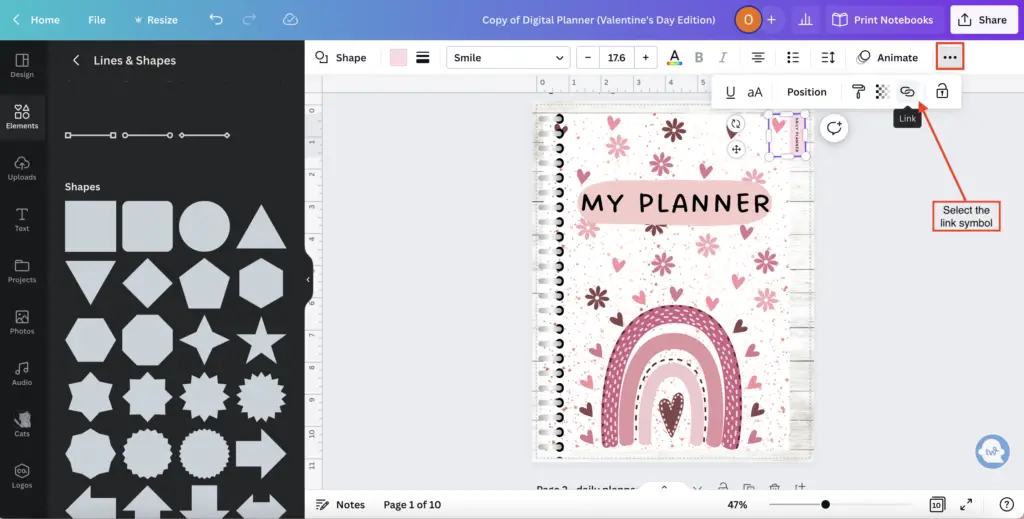
Step Two: Adding hyperlinks to your digital planner tab using Canva
Next, ensure that your shape (tab) is selected. Then, select the three dots on the right-hand side of the top ribbon. Once you’ve selected the three dots, click on the Link symbol.
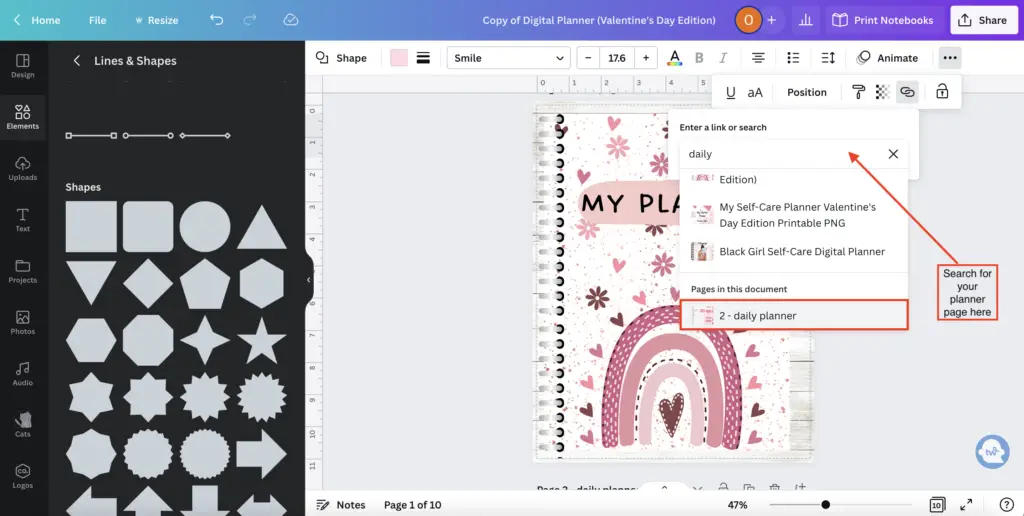
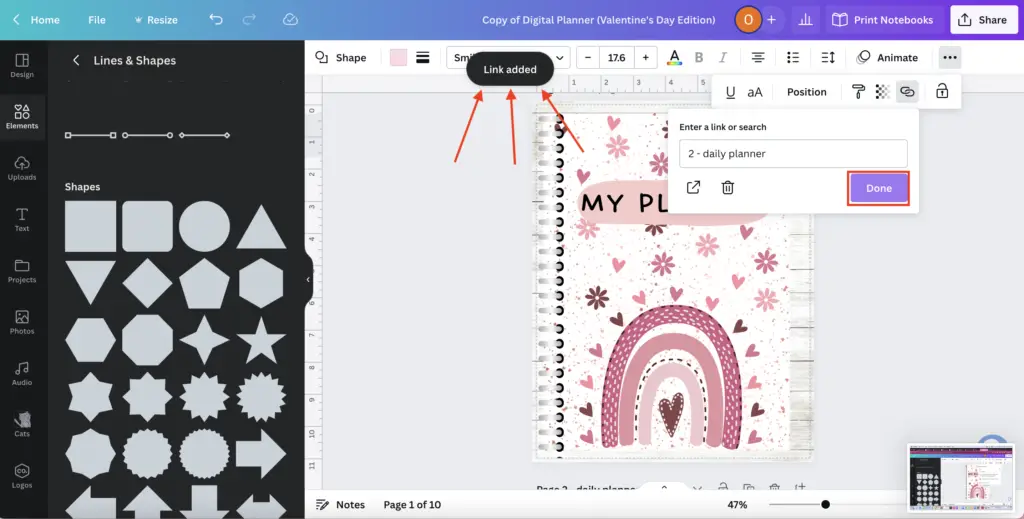
Step three: associating your planner page with your digital planner tab.
Now that you have selected the Link symbol, you will be given a drop-down menu to find the page you want to associate with your digital planner tab.
Search for your planner page in the search bar, and once found, hit enter.
Top tip: to make finding your planner pages easier, I recommend naming them first.
Step four: success you’ve hyperlinked your digital planner using Canva
After you’ve found your planner page to link to your tab, select done, and voila, you’ve hyperlinked your digital planner using Canva!
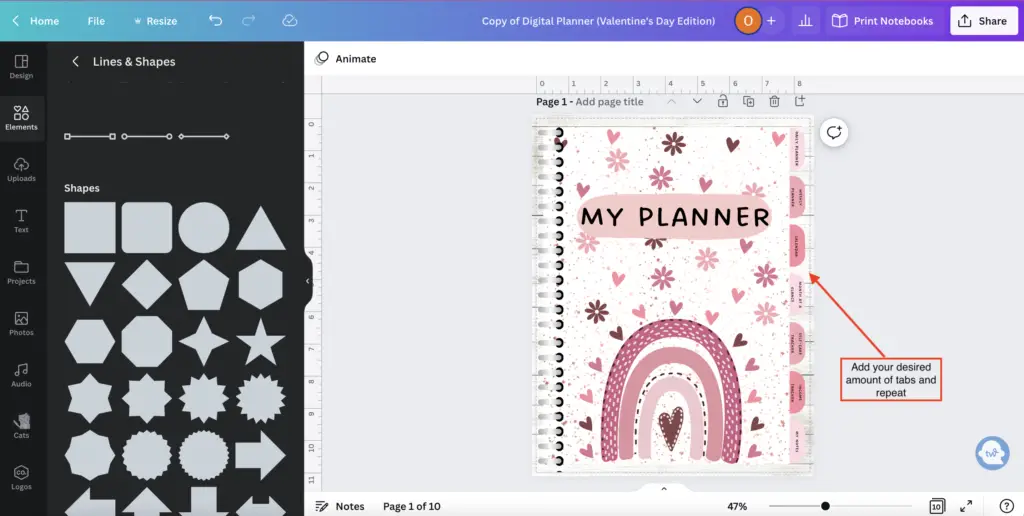
Step five: add more planner tabs and repeat
Now that you have hyperlinked one digital planner tab repeat the steps above for all your desired amount of digital planner tabs.
Final Thoughts: How to add hyperlinks to your digital planner in Canva
And there you have it, an easy tutorial on how to add hyperlinks to your digital planner in Canva.
See, that wasn’t too hard!
Canva makes creating digital planners super easy, using few resources and even for free.
Don’t forget to try your 30-day Canva Pro free trial here.
If you have any questions or comments, let me know in the comment section below.
You May Also Love:
- How to create a digital planner to sell using Canva like a boss
- Canva Free vs Canva Pro: Which one is worth it?
- How to make a digital planner with hyperlinks using Canva for free
- How to Create Digital Planners Using Canva Tips and Techniques
Tools To Use To Help Build Your Digital Planner Empire:
- Try Canva Pro free for 30 days
- Get 30-days free Skillshare access
- Visit my PLR Canva Template Shop
- Download amazing graphics and fonts with Creative Fabrica and Creative Market
- A helpful guide to opening an Etsy store
- Get your 40 free Etsy listings
- My Etsy shop (for digital planners and printables) use the Promo code: THANKYOU22 for a 5% discount on all purchases.
- Learn how to create incredible digital planners to sell on Etsy with the Create Digital Planners Like A Boss Babe Course
Hello,
Happy New Year !
My name is Charlotte (A.K.A SketchbookDraws) and I am 14 years old.
I have recently created an art blog at : https://sketchbookdraws.wixsite.com/website.
I am really interested in art, blogging and I am currently working on an online business selling digital products.
I have discovered your blog recently, and it helps me with my blog and business so much ! Thank you for sharing your business and blogging experience with us 🙂
I was wondering if I may put the link to your blog on the « Resources for Artists » page of my art blog (https://sketchbookdraws.wixsite.com/website/resources-for-artists) so that more people can discover your amazing content ? I know my blog has just started, but if you are interested, I’ll be glad to do it !
Thank you so much for your reply.
Best wishes,
Charlotte
Blog : https://sketchbookdraws.wixsite.com/website
Art Channel : https://odysee.com/@SketchbookDraws:9
Hi Charlotte,
I’m happy to hear that you’re enjoying my blog; much appreciated 😊! Yeah, for sure you can link my blog back to your page! Keep up the amazing work you’re doing. All the best, Olivia
Hello,
Thank you for your kind reply ,I really appreciate the support. I’ll add the link to your blog right away! The link is available at https://sketchbookdraws.wixsite.com/website/resources-for-artists, please tell me if anything is wrong.
Best wishes,
Charlotte